

[Bento] Tamagoyaki
Introduction:
Les omelettes enroulees japonaises ou tamagoyaki (ou dashimaki tamago) est un met classique des bentos japonais, populaire vis a vis des enfants, flexible ( vous pouvez ajouter des choses comme des tarako; des ognions verts,du nori etc),modulable (coeur,triangle,..). Mais ca peut paraitre difficile a realiser... voici quelques astuces pour vous guider.
I prefer the flavor of dashimaki tamago (rolled egg with dashi — bonito stock) to plain tamagoyaki as I like the nuance that dashi adds. The dashi does make the uncooked egg mixture more liquidy than with tamagoyaki, so it’s a little more delicate to form. The basic techniques are the same for both, though.
There’s an inspirational video of advanced dashimaki-making techniques by Itasan (Japanese restaurant chef and amateur videographer) here on YouTube. Itasan’s got many other Japanese cooking videos up — have a look. Another thanks to reader Corgi for pointing these out!
| Dashimaki Tamago Ingredients | Tamagoyaki Ingredients |
|
|
 |
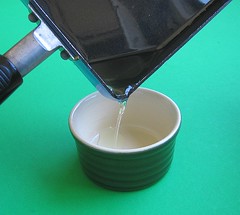
For best results, use a rectangular nonstick pan made especially for tamagoyaki. The small pan on the top holds a max of three eggs, the medium pan underneath can cook four to five. The small pan on top is actually very thin and poor quality (bought for US$1.50 at Ichiban Kan in SF, but I see the same one sold for $10+ on eBay), and offers poor heat control. Seek out a nonstick pan with a thick bottom. Some new pans have a textured nonstick interior so that less oil can be used during cooking. |
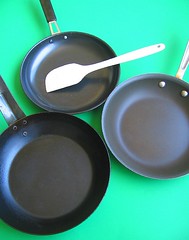 |
If appearance is less important to you or you just want to try it out without a rectangular pan, you can also use a regular round nonstick frying pan. Inexpensive, slick, relatively new, heavy, nonstick pans perform better with eggs than really high-end pans like All Clad, which are too textured to release eggs easily (tip from Alton Brown’s show on eggs, borne out by my experience). The trick then is to make three thick layers of egg (instead of more) and use a bamboo sushi mat to force the result into shape. The middle will be thicker than the ends because of the shape of the pan, so you can trim the ends after cooling. There’s an illustrated how-to here at JustHungry. |
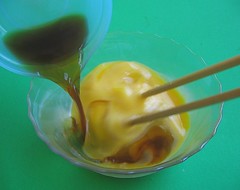 |
Japanese cookbooks advise that the eggs shouldn’t be mixed too much. If the eggs are overbeaten, they can develop a rubbery consistency. Use a left-right circular motion sweeping around the sides of the bowl instead of an up-and-down motion that would incorporate air. Briefly stir up the eggs in a bowl just enough to break up the yolks, then stir in the mixture of dashi, sake, sugar, salt and soy sauce. |
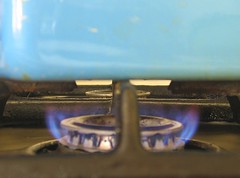 |
For beginners, the heat should be on low. |
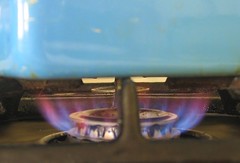 |
If you’re more advanced, you can turn up the heat to medium and be prepared to move quickly. |
 |
(If you have a nonstick pan, skip to the next step.) Yes, this is the scary shot with all that oil!! If your tamagoyaki pan is regular metal (no nonstick coating), you’ll want to liberally coat the bottom and sides with vegetable oil and drain the excess. You can also dip a folded paper towel into a bowl of cooking oil and use this to mop the pan as below. See the YouTube video here for an example.If using a regular metal pan, oil it first, then put it on the heat. If the pan gets too hot, just remove it from the heat for a moment to cool, then re-oil and proceed. |
 |
If you’re using a nonstick pan, heat the pan first, then dip a folded paper towel in vegetable oil and wipe the bottom and sides to coat. If the pan gets too hot, just remove it from the heat for a moment to cool, then re-oil and proceed. |
 |
SPEED TIP: Pour about 1/4 of the egg mixture into the pan and scramble as you would lightly cooked scrambled eggs. |
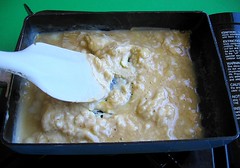 |
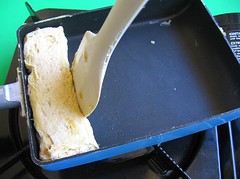
Cook the first 1/4 of the egg mixture like scrambled eggs. I find that a rubber spatula is easier to use for cooking and shaping than the chopsticks shown in Japanese cookbooks. Use whichever you’re more comfortable with. |
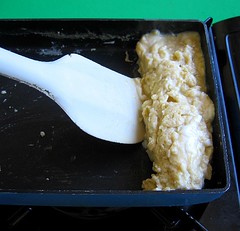 |
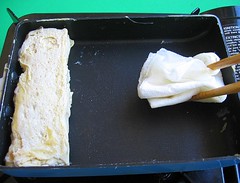
Push the first mass of scrambled egg to one side of the pan with your rubber spatula. Don’t worry about what the egg mass looks like at this point — it’ll be buried inside the tamagoyaki. |
 |
Use a folded paper towel dipped in vegetable oil to thoroughly oil and clean the surface of the pan. When done oiling one side of the pan, slide the egg mass over to the other side and oil the remaining surface. This oiling is crucial to ensuring that following egg layers will release and roll properly. |
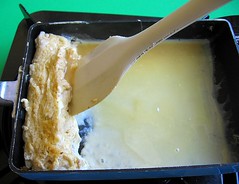 |
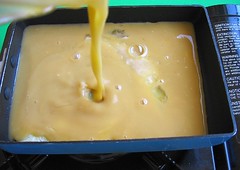
Start building thin layers of egg. Pour a ladleful of egg mixture into the pan and rotate the pan so that it coats the entire bottom. Quickly lift the cooked egg mass up and let the egg mixture flow underneath before putting it back down. This step is crucial in getting the layers to adhere. |
 |
When the new layer of egg is almost cooked through but still a little wet on top, it’s time to start rolling. |
 |
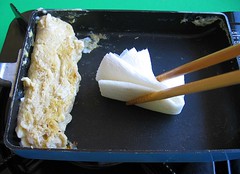
Use the spatula or chopsticks to gently flip the egg mass over into the middle, then once more until it hits the end. I find it helpful to let it sit for a couple of seconds after the first flip — it seems to adhere to the egg mass better and makes it easier to make the final flip. If you’re having trouble getting the egg to release from the pan, it may help to gently shake the pan from side to side or to run the spatula around the edges of the pan. If you’re using chopsticks to roll the egg mass, stick one chopstick down into the egg mass lengthwise to roll it neatly, using the second chopstick along the outside. This way you’ll be pulling it onto the egg layer, rather than trying to push it with chopsticks, marring the appearance. |
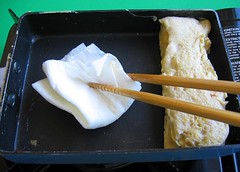 |
For the next layer, be sure to clean and oil the pan thoroughly (including the inner sides) with the oil-soaked paper towel to help the egg release from the pan. |
 |
After oiling one side of the pan, slide the egg mass over and oil the other side before starting on your next layer. Repeat the process until all of the egg mixture is used. |
 |
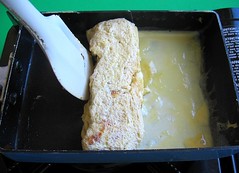
Use the rubber spatula to press the egg mass into shape against the side of the pan. You can also use a small wooden cutting board for the same effect. |
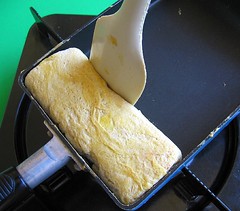 |
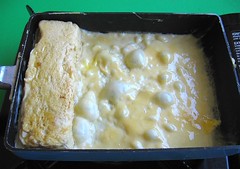
This is after rolling the final egg layer. I’m using the spatula to neaten up the shape. |
 |
If the roll seems undercooked or unstable, you may want to turn the roll on its side and cook briefly to firm things up. It doesn’t even have to look perfect at this point! Your safety net is waiting… |
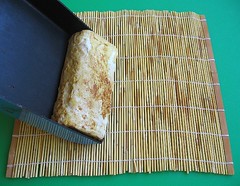 |
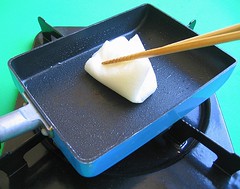
Turn the finished roll out onto a bamboo sushi mat to neaten up the shape as it cools. You can also use plastic wrap, paper towels, or a Silpat-type baking sheet in place of the bamboo mat (’makisu’). |
 |
Use your hands and the wrapping (makisu, plastic wrap, paper towels, Silpat, etc.) to forcibly shape the roll however you like. This particular roll’s shape is already fine; a better example of shaping can be seen in the YouTube chef’s video demonstration. If you want round dashimaki, you can put rubber bands around the sushi mat, then let it cool like that. |
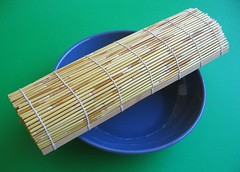 |
Cool the roll to allow residual heat to cook any undercooked egg and adhere the layers. The benefit of using a bamboo sushi mat (’makisu’) is its ability to let steam escape while it retains its shape — even when suspended over a bowl here for speedy cooling. If you don’t have a makisu, allow it to cool on a cutting board, wrapped for shaping if necessary. |
 |
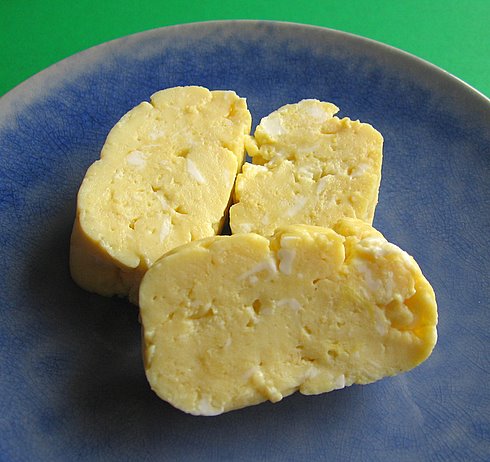
When cool, slice and serve. If the eggs are still runny when you cut into it, microwave briefly on medium power to finish cooking. Dashimaki tamago is usually served with a side of grated daikon (Japanese radish) and soy sauce, but I don’t bother when packing it in a lunch. It’s nice when hot, but allow it to cool completely if packing in a lunch to avoid condensation inside the bento box for best packed lunch food safety. |
I made a big dish of dashimaki last year for my husband’s 40th birthday party. It was actually a pretty good make-ahead dish as I was able to knock out 10 rolls the day before, refrigerate them in Tupperware, then just slice and plate them right before the party. It was a big hit — our friends dubbed it “Japanese French toast” and polished it all off in no time.

Faux tamagoyaki ou plutôt la "version rapide":
ometimes I’d like to have tamagoyaki (Japanese rolled omelette) at home, but just can’t be bothered to spend the time it takes to make the individual layers. A recent Orange Page magazine story on make-ahead bento lunches showed how to make a speedy shortcut version of tamagoyaki in a round frying pan with no rolling, so I was intrigued. Essentially molded scrambled eggs, I made this the other day when I was making dashimaki tamago for four people using eight eggs. This many eggs would ordinarily mean making two separate rolls the standard way, but that was just too much to deal with on a tight schedule. So I tried out the super-speedy version and was pleased with the result. I wouldn’t serve it to impress guests or anything, but it’s definitely a nice tool in the speedy bento lunch toolbox. I used my standard recipe for dashimaki tamago, but this method is actually easier with tamagoyaki as there’ll be less leakage when the egg rests on the cutting board (recipes and full tutorial for both dashimaki and tamagoyaki here).

Scramble eggs normally over medium heat until heated through but not dry (click on photo for a larger view of the moist curds).

Spread a large piece of plastic wrap out on a cutting board, and
turn out the moist egg curds onto the plastic wrap while still hot
moldable. Tightly wrap the egg with the plastic wrap, and use your
hands to form it into a log shape that’s slightly larger than a regular
tamagoyaki roll. Let it sit, tightly wrapped, for 10 minutes so that
the egg sets up in the right shape. Unwrap and cut into slices.

You can also use a bamboo sushi mat (’makisu’) to push the egg into shape, as shown here.
Tip: You’ll get best results with this method if you prepare the more solid tamagoyaki as opposed to dashimaki tamago, but dashimaki is also doable. The excess liquid in dashimaki tamago will spill out of the plastic wrap after molding (also during molding if you’re not careful). After you unwrap it, just dry the entire egg log by blotting lightly with paper towels and slice as usual. You can also make a variation by reducing the amount of dashi in the egg mixture, thus reducing the amount of leakage at the end.


/https%3A%2F%2Fassets.over-blog.com%2Ft%2Fcedistic%2Fcamera.png)
![[Dessert] Les perles du Japon coco au fruit du dragon](https://image.canalblog.com/ka2LplNQr5bVkale_Xqflf-Zn14=/400x260/smart/filters:no_upscale()/https%3A%2F%2Fstorage.canalblog.com%2F96%2F57%2F416475%2F34082308_o.jpg)
![[Bento] Boulettes de boeuf croquantes et épicées](https://image.canalblog.com/n3eJsWp2nCLZnEh4EWH2J_oteYo=/400x260/smart/filters:no_upscale()/https%3A%2F%2Fstorage.canalblog.com%2F67%2F91%2F416475%2F34082069_o.jpg)
/https%3A%2F%2Fprofilepics.canalblog.com%2Fprofilepics%2F3%2F5%2F358633.jpg)